Panel help
FluxCRM panel: everything you do with an opportunity, in one place
A guide for salespeople and advisers. From the first login to reports, with pictures from the real panel (the screenshots show the Polish interface).
Work from top to bottom: first what is waiting for a reply, then tasks, and last the missing data.
Video: first steps in the panel
Nine short scenes from the real panel (about 45 seconds): from the "Waiting for us" list to demo mode. The captions are in Polish; the phone version is below.
First login
- Open the CRM address given by your administrator and enter your login and password. The password has at least 10 characters.
- If your account uses 2FA, also enter the 6 digits from your authenticator app (they change every 30 seconds).
- On the first visit the panel shows three short introduction steps. You can skip them and return to them from the Shortcuts (?) window.
- A session lasts 30 days from the last use. Log out in the top right corner ends it at once.
The panel installs like an app on a computer and a phone. Instructions: installing the app.
How to work with the CRM day to day
You start the day on the Now screen, which walks you through a day plan in three steps. Step 1. Reply and call back lists customers waiting for our answer, longest first; Start: one by one opens the first card and Next moves to the following one. Step 2. Tasks for today gathers tasks due today and overdue ones. Step 3. Tidy up shows opportunities postponed until today, offers without a reply for more than 14 days (close them as lost with a reason, or with one click as "Not a lead") and opportunities with missing data. An empty step shows "Done" and the panel highlights the next one. When all steps are empty, the panel says "All done for today" and takes you to the Kanban, which shows everything. Kanban and Table below the plan are for reviewing all opportunities, not for the daily queue.
Main screen: list and kanban
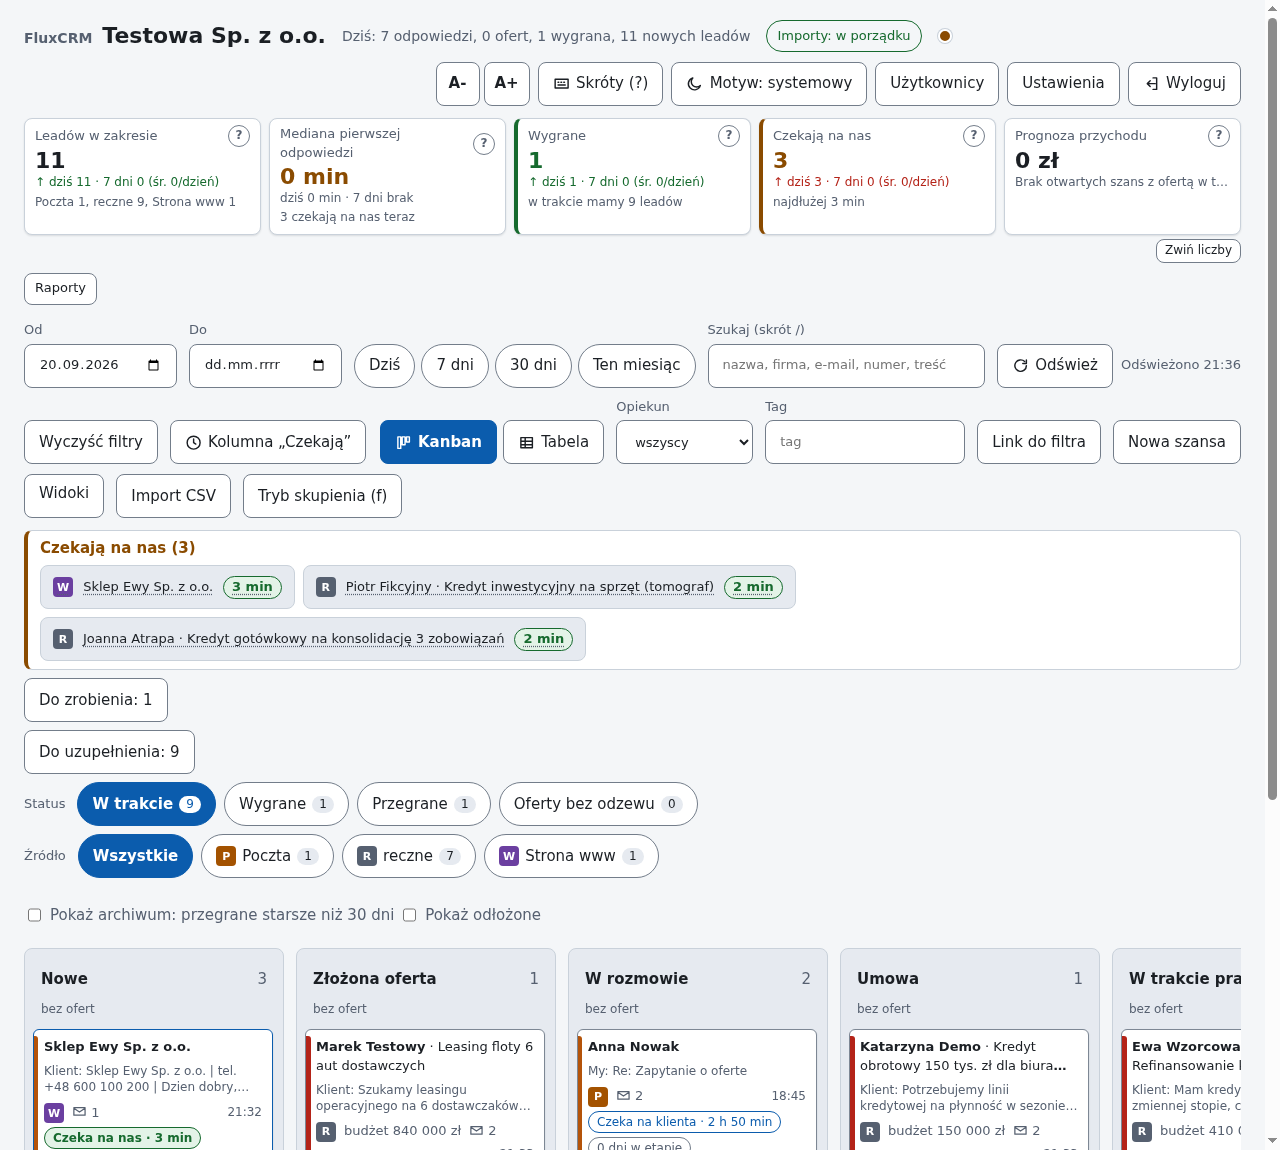
The screen has four bands, from the top:
- Numbers: how many leads in the chosen date range, the median first-reply time, wins, how many people are waiting for us, and the revenue forecast. The
?next to a tile explains how the number is calculated. - Filters: date range (From, To, Today, 7 days, 30 days, This month), search, owner and tag. Filter link copies the address with the current filters so you can send it to a colleague.
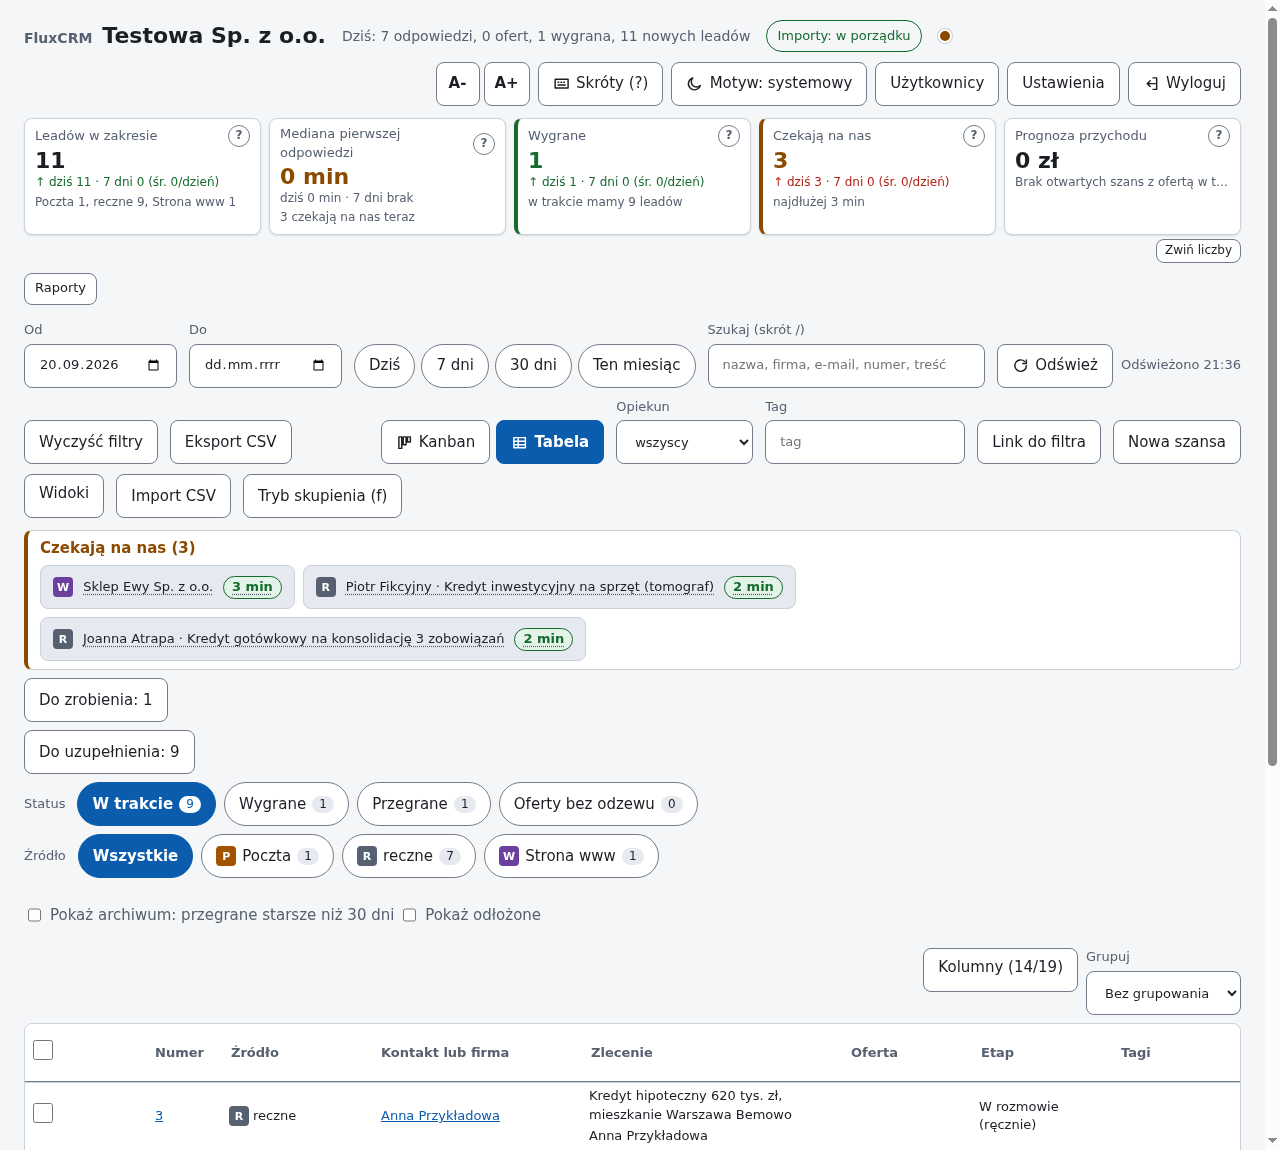
- View switch: Kanban (stage columns) and Table (one opportunity per row, columns can be hidden).
- Status and source buttons: In progress, Won, Lost, Offers with no reply, and where the lead came from (mail, website, manual, phone).
By default the panel hides lost opportunities with no activity for 30 days (tick Show archive) and opportunities snoozed for later (Show snoozed).
Waiting for us
The Waiting for us bar collects opportunities where the customer wrote and we have not replied yet. The colour of the time: green up to 2 hours, yellow up to a day, red longer. This is the most important place in the panel: start your day here.
The f shortcut turns on focus mode: the panel shows the waiting ones one by one, without distractions.
Below the bar there are two work counters:
- To do: tasks due today and overdue.
- To complete: opportunities missing important information (for example a phone number, an amount, or consent to processing). Click to see the list of gaps.
The opportunity card
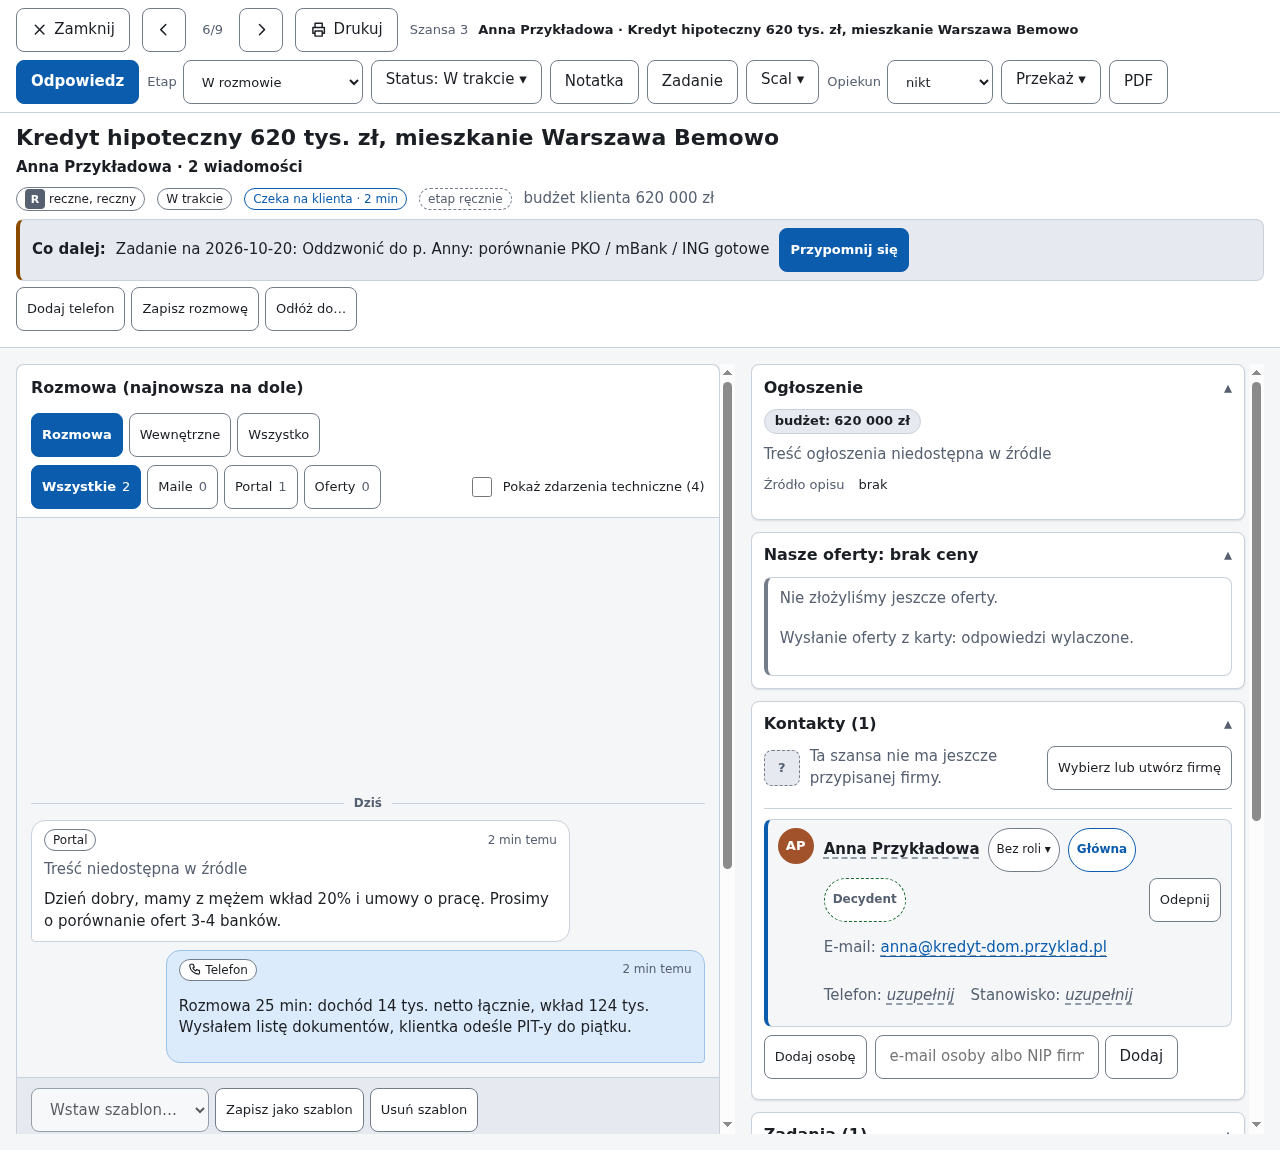
Clicking an opportunity opens its card. The < and > arrows (or the [ and ] keys) go to the previous and next opportunity on the current list, so you can go through the whole queue without going back.
At the top of the card:
- Reply: the reply box for the customer.
- Stage and Status: manual change (described below).
- Note, Task: internal entries that the customer does not see.
- Merge: joins two opportunities of the same customer into one.
- Owner and Hand over: who handles the case, and handing it to a colleague with a note.
- PDF: a printout of the card.
Under the title there is the What next bar: one sentence about what the system considers the next move (for example a task for today or a reply to the customer), with a button that does it.
The left column is the conversation timeline: emails, text messages, notes from phone calls and technical events (the last are hidden by default). The right column holds the case data: the request text, offers, contacts and company, custom fields, GDPR consents, documents, bank applications and settlements (where the instance has the credit industry).
Replying to the customer
- Click Reply (shortcut
r) and type the text. Ctrl Enter sends it. - If the instance has the approval queue switched on, the reply first goes for approval. Nothing reaches the customer until someone clicks Send.
- The panel can propose a draft reply and free call slots from the calendar. You can always edit the draft.
- You send a text message from the card from a template; it goes out from the adviser's phone or from an SMS operator, depending on the instance.
- You can send one reply to two channels at once (for example email and text message): tick Also send under the field. The text message gets a shortened version of up to 160 characters, shown in a preview that you can edit. Approve now (owner or salesperson account) approves all chosen channels with one click.
- Under the reply field you see the state of each send: queued, approved, sent, or failed with the reason and a Retry button. Channel log shows messages with the channel icon and a filter by channel.
- In the list (Table and Today) the Reply button opens a quick reply without opening the card; Send now approves it with one click.
Reply channels and time windows
| Channel | Reply window | Limit and notes |
|---|---|---|
| Messenger, Instagram | 24 h from the last customer message; up to 7 days for a human reply (human agent tag) | after that the field is locked |
| 24 h from the last customer message | outside the window only an approved template | |
| Useme | no window | up to 5000 characters, no phone or email in the text (portal rules) |
| Freelancehunt | no window | up to 4000 characters, no phone or email in the text |
| Email, form | no window | up to 5000 characters, goes through the approval queue |
| SMS | no window | 160 characters, only when the lead has a valid number, is not on the STOP list and did not ask for no contact |
| Facebook (groups) | no window | comment under the post, daily limits and gaps from the configuration, paused when the account is blocked |
Notes, tasks and snoozing
- Note (
n): something that should stay with the case. A record of a phone call is Log call. - Task (
z): what, when and for whom. On the due date the task appears in the To do counter and in the notification. - Snooze until...: hides the opportunity from the list until the chosen date. It comes back by itself when the customer writes.
- From a task notification you can snooze it by 3 days with one click on the link.
Stage and status
These are two different concepts (more in the glossary):
| Concept | Question | Examples |
|---|---|---|
| Stage | Where is the case in the funnel? | New, Offer sent, In conversation, Contract |
| Status | What is the outcome? | In progress, Won, Lost, Offers with no reply |
The system calculates both by itself from facts (messages, offers, pro forma invoices). A manual change (e for stage, s for status, w won, p lost) always takes precedence, and choosing auto gives the decision back to the system. When you mark a loss you choose a reason, so reports show why we lose cases. The Contract stage and later ones require the contract amount and the delivery date.
After a win: 7 steps
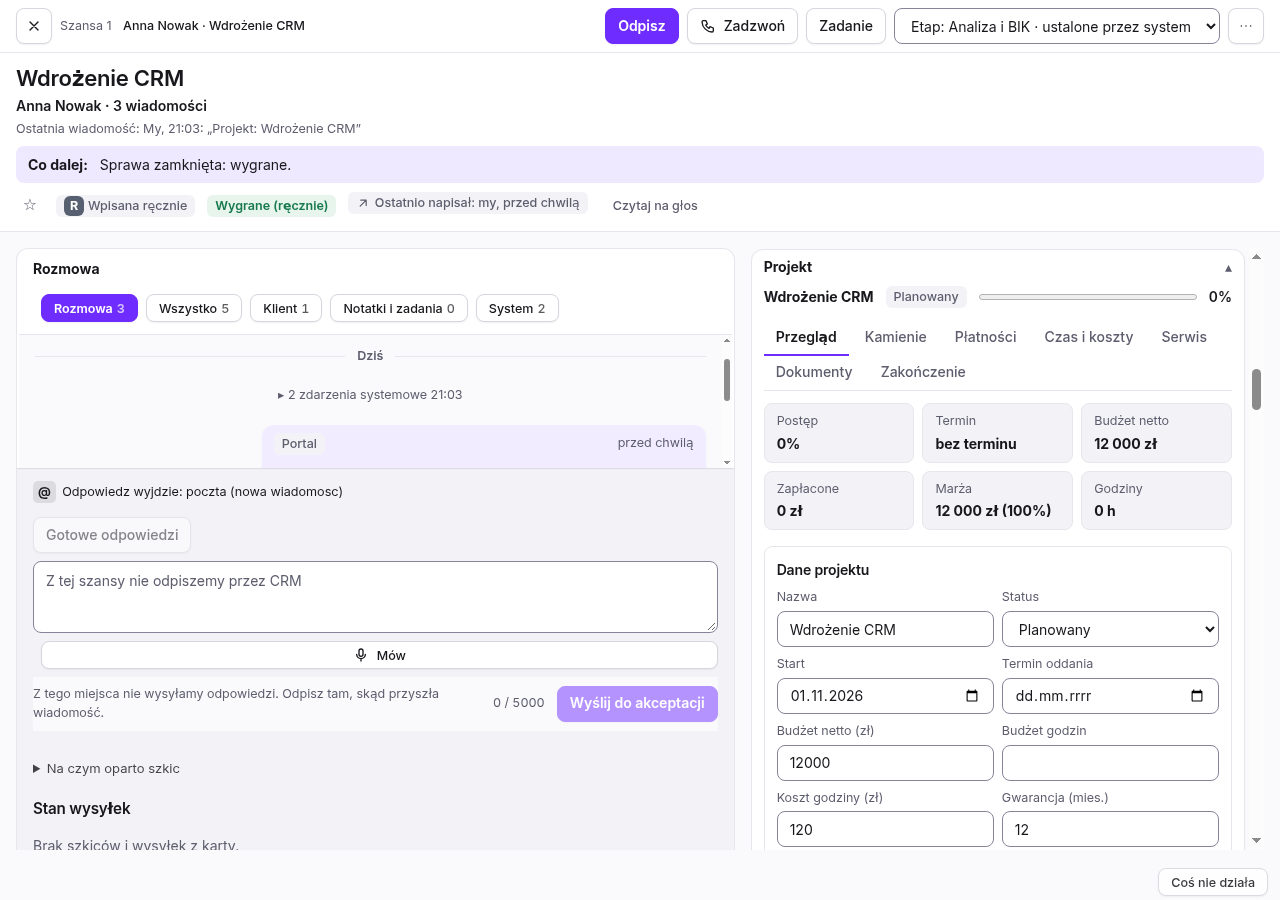
A win is finished only when the invoice is paid and sent to KSeF and the customer has given feedback. Follow the same steps for every won opportunity.
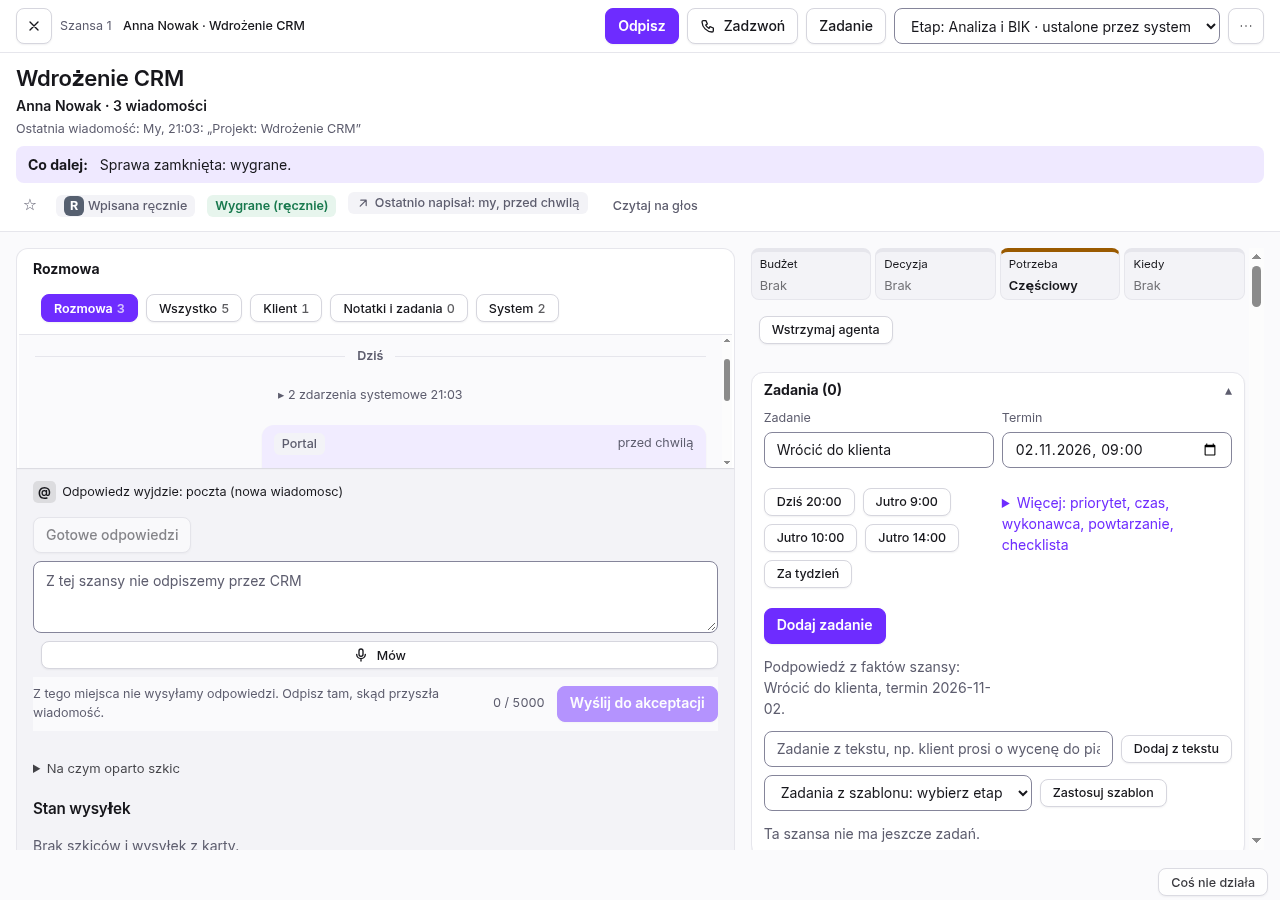
- Win with an amount and a service. Mark the opportunity as won (
wor Status: Won). The panel asks for the contract amount and the service; you can fill them in later, and a missing value goes on the "To check" list.
- Buyer. Check the tax ID, name and address of the buyer in Customer data. For companies the panel fills them in from the KRS register and flags any difference from what you entered.
- Contract. In Contracts choose a template and press Create contract. The amount and subject come from the win.
- Schedule and pro forma. In Project, tab Payments, set the instalments (Payment schedule and partial invoices) and press Issue pro forma for the first one. The panel will not issue a second pro forma for the same instalment without confirmation.
- Payment. When the money is on the account, press Mark as paid on the instalment. Bank statement payments are reconciled with revenue every month.
- Invoice in KSeF. Press Issue invoice, then Send to KSeF and Check KSeF status. It is done when the invoice has a KSeF number.
- Handover and feedback. In the Completion tab set the handover status and, after completion, record the customer rating (Survey after completion).
Every later change of the amount, date or buyer is recorded in Changes after the win (who, when, the previous value).
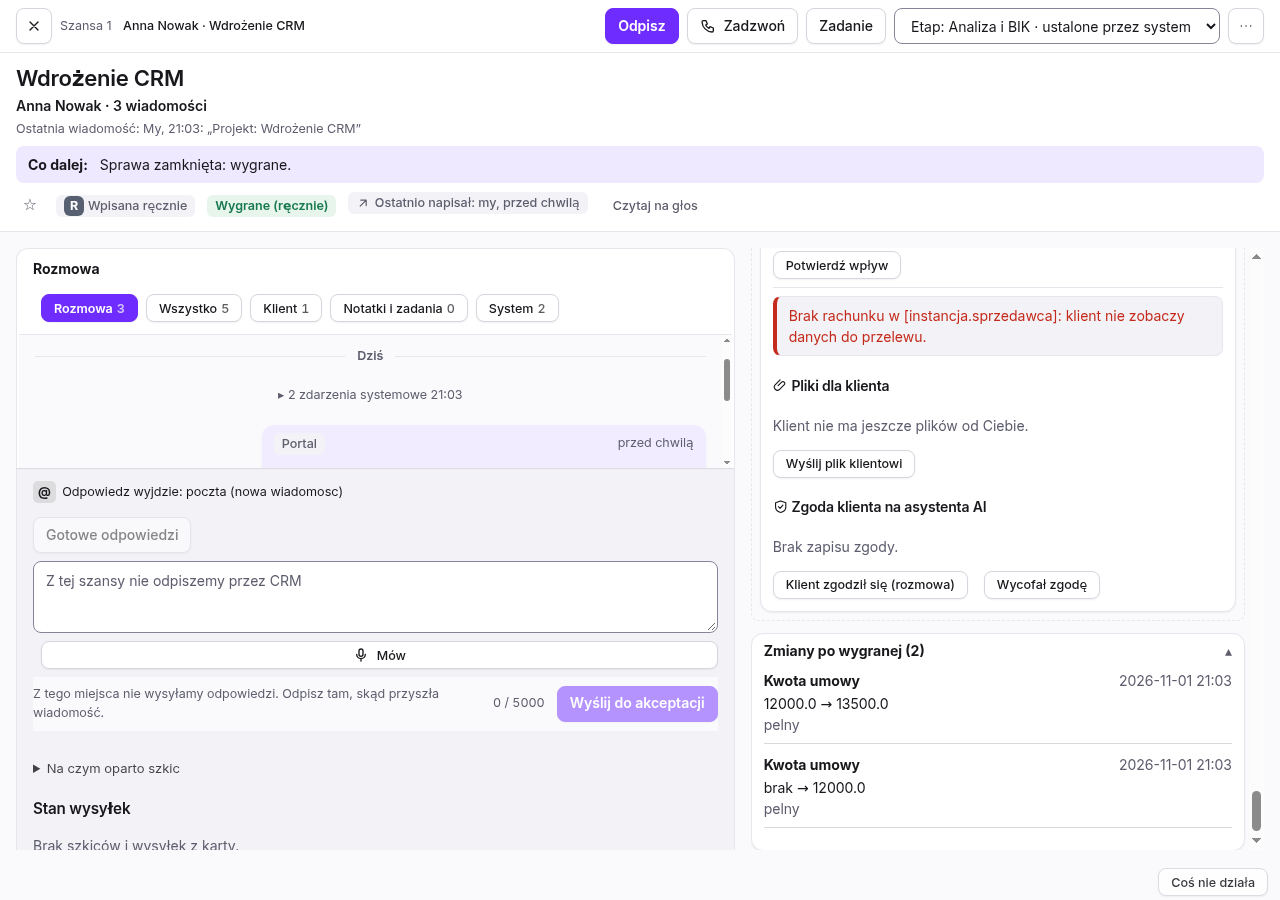
Once a day the system looks for wins without a contract, project or schedule, and for invoices and instalments without a won opportunity. The goal is zero such items; the list is shown by python -m fluxcrm po-wygranej niespojnosci.
Companies, people and GDPR consents
- In the card you add a company and people (decision maker, accountant) with roles. Company data can be completed from registers if the administrator switched that on.
- The Consents section shows who agreed to what and when (marketing, data processing, a credit bureau query) and where that is known from. You add a consent by hand when the customer gave it by phone or email, and you enter the proof (for example a recording number).
- When a customer withdraws consent, mark the withdrawal: the opportunity stays, and the system stops sending marketing to them.
- A customer's request about their data is handled by the administrator: GDPR for customers.
Data quality
- In the opportunity card the Data quality section shows a score of 0-100 (contact, company, source, budget, description, customer engagement) and warnings: no phone and email, a wrong or own address, a disposable address, a contact from the stop list, suspected spam. Fixing the data raises the score at once. It also shows the language the customer writes in and, when it differs from yours, a Translate conversation button (if the administrator enabled translation).
- The email address is checked when saved: its syntax and whether the domain accepts mail (MX). No internet does not block saving; the address then only gets the "unchecked" status.
- Signatures from customer emails: position, phone and name from the signature under an email. The Add person or Complete person button fills in only empty fields and never overwrites what was typed by hand.
- Email attachments: a list with the file type and size. Images have a thumbnail (the file is fetched from the mailbox on demand), the rest has a Download button.
- This is spam trains the filter: after a few decisions in each group, new opportunities that look like spam get the
suspected-spamtag (we never close or delete anything). This is spam, add address to the stop list also adds the address to the stop list. - Settings, the Data quality block: a weekly report (how many opportunities have no contact, a bad address, no company, or need merging), opportunities to fix from the lowest score, the stop list (an address, domain or number: we will not send email to such a contact and the phone will not ring for advisers), proposals to merge people with many addresses, and an editable list of loss reasons.
- When the opportunity's company has a tax number (or the number is in the customer's messages), Fetch company data fills in the name, address, REGON, KRS and VAT status from the official register. When the company has a website, Complete from the company website adds a missing phone or tax number.
Search, views and tags
/jumps to search: it looks in name, company, email, number and message text.- Ctrl K opens the command palette: searching opportunities and all panel actions in one box.
- Views remember a set of filters under a name (for example "My customers, Warsaw"). You can make one view the default.
- You add tags in the card and filter by them on the list.
Import and bulk actions
- CSV import loads contacts from a file (also from Excel in Polish). It first shows a preview and a proposed column mapping, and only then saves. The same email does not create a second opportunity.
- In the table select up to 200 opportunities and run one action on all of them: status, stage, tag, owner or loss.
- Migration from Pipedrive, HubSpot or Excel: we load the export files as a dry run first and then for real, without duplicates. Write to pawel@fluxlab.pl and we will show you how to prepare the files.
Reports and numbers
The Reports button opens the summaries: funnel, revenue, losses and reasons, bottlenecks, period comparison, and breakdown by adviser, source and campaign. A salesperson with their own account sees only their own opportunities. The owner also gets a monthly PDF report.
Phone and the Dzwonek app
On a phone the panel has a bottom bar: Kanban, Table, Queue, Search.
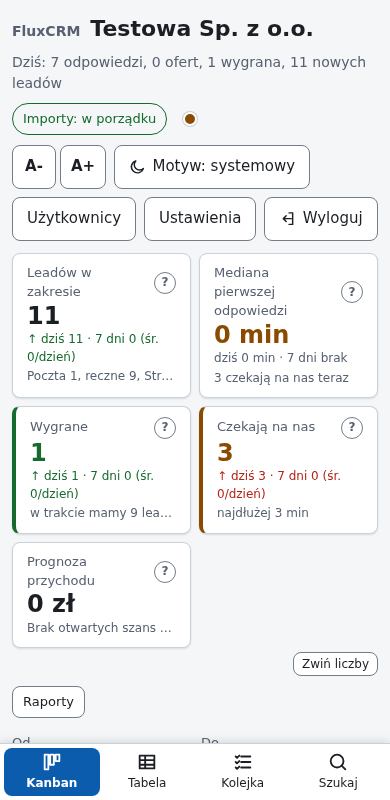
A new lead with a phone number rings the adviser's phone through the Dzwonek app: first you see the product and the source, and the number only after you press Accept. Installation on Android and iPhone: adviser app.
Keyboard shortcuts
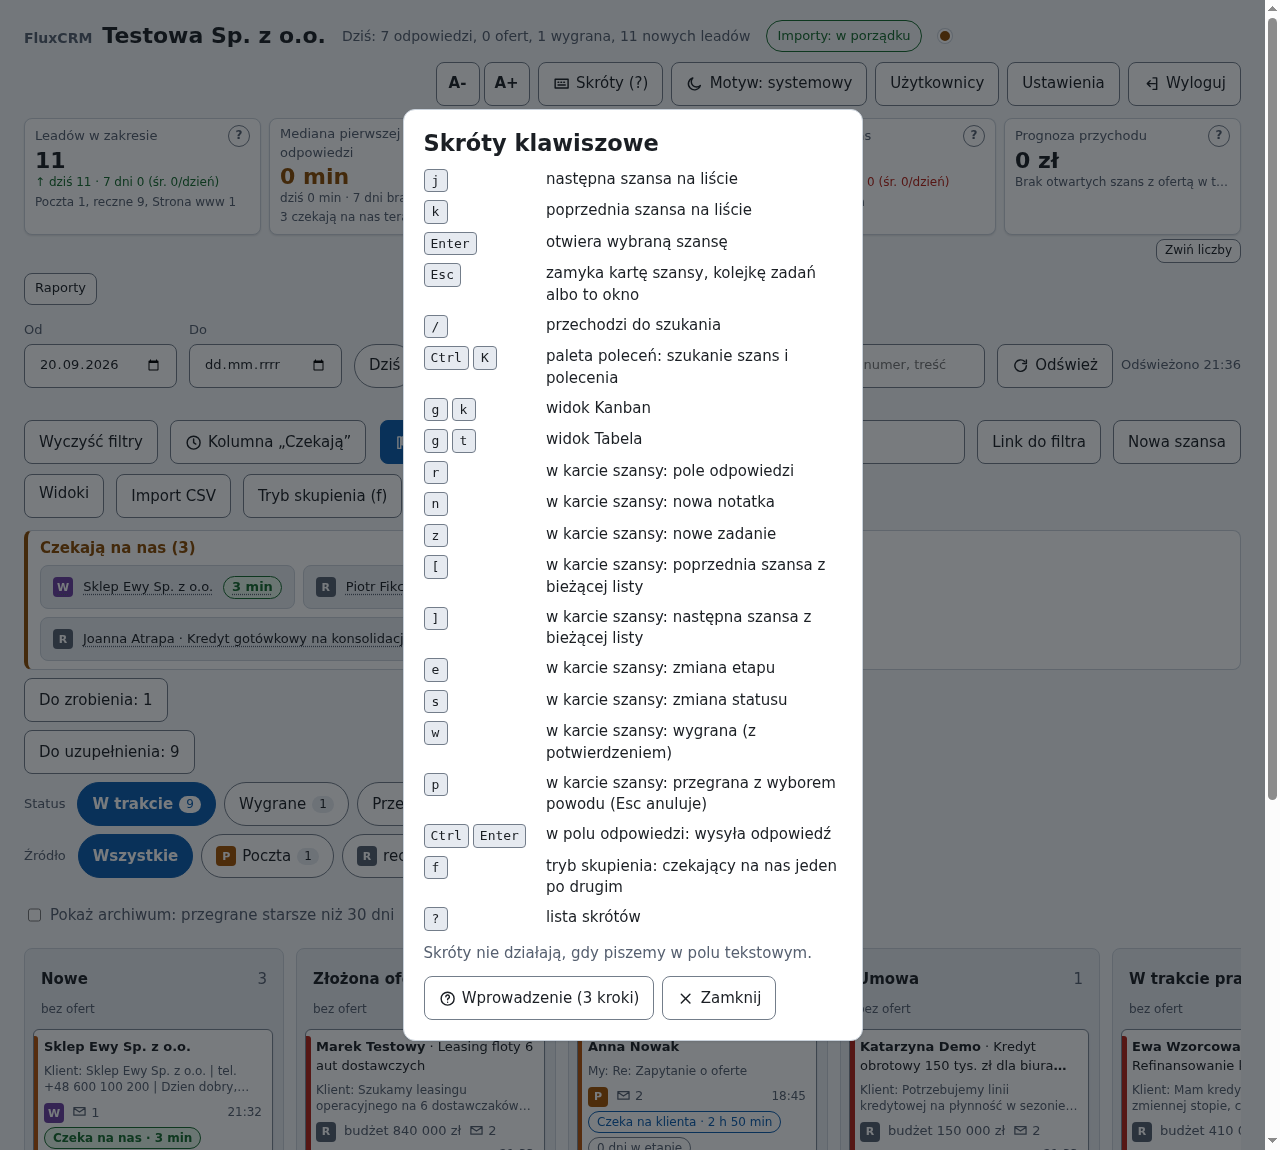
| Shortcut | Action |
|---|---|
j / k | next and previous opportunity on the list |
Enter | opens the selected opportunity |
Esc | closes the card, the task queue or the shortcuts window |
/ | search |
Ctrl K | command palette |
g k, g t | Kanban view, Table view |
r, n, z | in the card: reply, note, task |
[, ] | in the card: previous and next opportunity |
e, s | in the card: stage, status |
w, p | in the card: won, lost |
f | focus mode |
? | list of shortcuts |
Shortcuts do not work while you type in a text field.
Accounts, roles and account security
| Role | What it can do |
|---|---|
| Owner | everything, including user accounts, settings and data export |
| Salesperson | full access to opportunity data, without managing accounts |
| Read only | can view, cannot change anything |
You set your own password and 2FA together with the administrator. The A- and A+ buttons change the font size, and Theme switches between the light and dark screen.
When something does not work
- The dot next to the company name shows the state of the instance: green is fine, yellow is a warning, red is an outage. Click it to see the causes.
- Imports: need attention means that the mailbox or another source is not fetching new messages.
- The panel shows errors in plain language and suggests what to do ("What to do: ..."). If that is not enough, write to the instance administrator or to pawel@fluxlab.pl and give the opportunity number and the time.
- Frequent questions: FAQ. Terms: glossary.